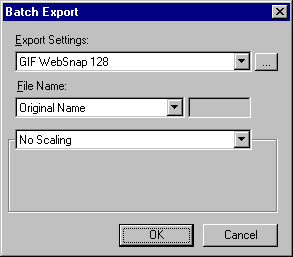
You can change file type, file optimization, or scaling settings when performing a batch process by checking Export in the Batch Process dialog box. When you check Export, the Batch Export dialog box appears, prompting you to enter settings to apply during the batch process.

To set export settings to apply to files during a batch process:
| 1 | From the Batch Process dialog box, choose Export or click the browse button (...) to open the Batch Export dialog box. |
| 2 | From the Export Settings pop-up menu of the Batch Export dialog box, choose an option: |
| Choose Use Settings from Each File to use each file's previous export settings during the batch process. For example, when batch processing a folder of GIFs and JPEGs, the resulting files will still be GIFs and JPEGs, and the original palette and compression settings are used when exporting each file. | |
| Choose Custom or click the Custom Edit button to open the Export Preview dialog box and enter custom export settings for the batch process. | |
| Choose a preset export setting or a previously saved user export setting to use for the batch process. All preset settings and saved user export settings appear in the Export Settings pop-up menu. | |
| 3 | Click OK to return to the Batch Process dialog box and finish the batch process. |
To set naming options for batch-processed files:
| 1 | In the Batch Process dialog box, choose Export or click the browse (...) button. |
| 2 | In the File Name pop-up menu of the Batch Export dialog box, choose an option: |
| Choose Original Name to leave file names unchanged. | |
| Choose Add Prefix and enter text in the File Name text box to add the specified text to the beginning of the file name of each batch processed file. | |
| Choose Add Suffix and enter text in the File Name text box to add the specified text to the end of the file name before the file extension. For example, if "_thumb" is entered in the File Name text box, then the file Soerbaird.gif would be renamed to Soerbaird_thumb.gif when it is batch processed. | |
| 3 | Click OK to return to the Batch Process dialog box and finish the batch process. |
To set scaling options for batch-processed files.
| 1 | In the Batch Process dialog box, choose Export or click the browse (...) button. |
| 2 | In the Scaling pop-up menu of the Batch Export dialog box, choose an option: |
| Choose No Scaling to export the files unaltered. | |
| Choose Scale to Size and enter a width and height to scale images to an exact width and height. | |
| Choose Scale to Size and enter or choose a value in either the Horizontal Scaling option or Vertical Scaling option to scale images proportionally but restrict width or height. For example, to proportionally scale images to be 50 pixels wide, type 50 in the Horizontal Scaling option and choose Variable in the Vertical Scaling option. | |
| Choose Scale to Fit Area and enter Max Width and Max Height to proportionally scale images so that they each fit within a specified width and height range. | |
| Note: Choose Scale to Fit Area to convert a group of images to thumbnail images. | |
| Choose Scale to Percentage to scale images by percentage. | |
| 3 | Click OK to return to the Batch Process dialog box and finish the batch process. |